

Add chat to your website
Add your bot to a website by pasting a short install code, embedding an iframe, or connecting WordPress. Each method publishes one of the website channels: Chat bubble, Center stage, or Help page.
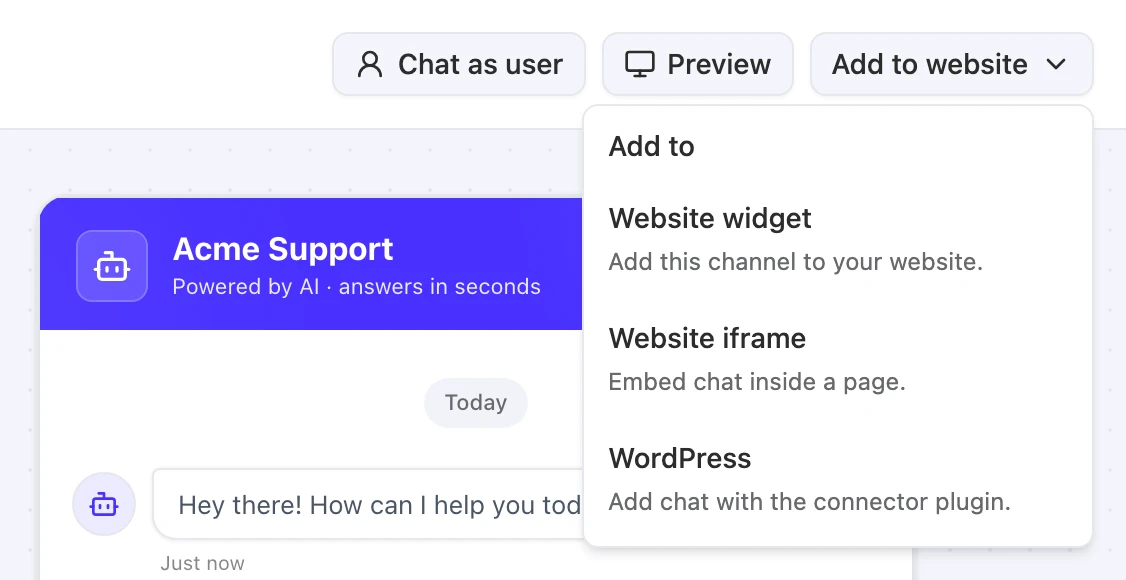
Open Bot > Channels, open a website channel, and select Add to website (or Share link for the Help page). The bot’s Dashboard also has an Add to Your Website card with Use on a WordPress site and Use on any other site.
Before you start
- Turn on the channel you want to add in Bot > Channels. Every channel starts disabled on a new bot, and a disabled channel doesn’t load on your site.
- You need widget edit access to open website channels: Owner, Team Admin, Bot Admin, or Bot Editor with access to this bot.
- You need access to edit your website’s HTML, or WordPress admin access for the WordPress method.
Choose a method
| Method | Channels | Use it when |
|---|---|---|
| Website widget | Chat bubble, Center stage | You can add a script to your site. Supports signed visitor identity and the Widget SDK. |
| Website iframe | Chat bubble | You want chat inline inside a page, at a fixed spot. |
| Public help page | Help page | You want a hosted page to link to. See Help page. |
| WordPress | Chat bubble, Center stage, Help page | Your site runs WordPress and you can install the connector plugin. |
Add the website widget
-
Turn the channel on. In Bot > Channels, turn on Chat bubble availability or Center stage availability.
-
Open the install code. Open the channel, then select Add to website > Website widget. The panel is titled Website bubble for the Chat bubble and Website center stage for Center stage.
-
Copy the code. Under Widget setup, select Copy install code. The code already contains your bot ID.
-
Paste it before the closing
</body>tag. Add it to every page where chat should appear, such as your site’s shared footer or layout template, then publish your site.
The Chat bubble install code looks like this. Always copy the real code from Add to website > Website widget: it contains your bot ID and the correct script address, shown here as YOUR_WIDGET_HOST.
<script src="https://YOUR_WIDGET_HOST/fluentchat-loader.js"></script><script> if (typeof window.FluentChat?.mount === "function") { window.FluentChat.mount({ botId: "YOUR_BOT_ID" }).then( widget => { window.fluentChatWidget = widget; }, () => console.warn("Chat is temporarily unavailable.") ); } else { console.warn("Chat is temporarily unavailable."); }</script>The Center stage code is the same except for the mount options:
window.FluentChat.mount({ botId: "YOUR_BOT_ID", layout: "center-stage" })Always copy the code from the app rather than typing it. The app fills in your bot ID and the correct loader address.
The bot Dashboard has the same Chat bubble code. Open Use on any other site, then select Copy Embed. Copy bot ID copies the ID on its own.
The code saves the widget as window.fluentChatWidget, so your page can control it. For example, window.fluentChatWidget.open() opens the chat from your own button. See Widget SDK.
Embed chat with an iframe
The Website iframe puts the Chat bubble’s chat inline, where you paste it. “Uses your saved Chat bubble settings.”
-
Turn on the Chat bubble. The iframe uses the Chat bubble channel, so it must be enabled.
-
Copy the iframe code. Open Chat bubble, select Add to website > Website iframe, then select Copy iframe code. Open iframe opens the same chat in a new tab.
-
Paste it where chat should appear. “Adjust the height to fit your layout.”
<iframesrc="https://dash.fluentbot.ai/chatbot-iframe/YOUR_BOT_ID"title="Chat with our team"width="100%"style="height: 700px; border: 0"loading="lazy"></iframe>Add chat to a WordPress site
Choose Add to website > WordPress on the Chat bubble or Center stage, or Share link > WordPress on the Help page. What the dialog shows depends on the bot’s WordPress connection:
| Connection | What the dialog says |
|---|---|
| Not set up | Three steps: download and install the connector plugin, generate a connection token in this bot’s WordPress integration, and paste the token into the connector. “Your WordPress site must be publicly reachable over HTTPS.” |
| Disabled | ”Enable the existing WordPress connection before adding this channel.” Select Open WordPress integration. |
| Can’t be reached | ”The existing WordPress connection could not be reached or verified. Check the connection before adding this channel.” |
| Waiting for the plugin | ”Finish connecting the existing WordPress integration before adding this channel.” |
| Connected | For the Chat bubble and Center stage: “Choose where this channel appears in FluentChat → Channels in WordPress.” For the Help page: “Add the Help Page block or shortcode to a page in WordPress.” |
See WordPress integration for the full setup.
Identify signed-in visitors
The Website widget panel also has an Identity verification section: “Identify signed-in visitors with a JWT generated by your website’s server. Anonymous visitors can still chat.”
To set it up, select Generate bot secret, store the secret on your server, and have your server issue a short-lived token for each signed-in customer. “Old team signatures no longer work.” If you set up identity before, update your signing server.
For the token format and the browser code, see Identity verification.
Limitations
- The iframe embed works with the Chat bubble only. Center stage uses the website widget or WordPress.
- The iframe can’t use signed visitor identity or page events. Use the website widget for those.
- Each bot has one configuration per channel. Every site that embeds the same bot’s Chat bubble shows the same settings.
- Disabled channels don’t load. Turning a channel off also stops visitors who already have the page open.
Troubleshooting
The browser console shows “Chat is temporarily unavailable.”
Possible cause: The widget couldn’t start. The most common reason is that the channel is disabled. A wrong bot ID or a blocked loader script also causes this.
Solution: Turn on the channel in Bot > Channels and reload. If it still fails, copy the install code again from Add to website so the bot ID matches.
Nothing appears and the console shows a Content Security Policy error
Possible cause: Your site’s Content-Security-Policy blocks the loader script or the widget’s connections.
Solution: Allow the loader’s host in script-src, and allow the FluentChat addresses named in the console error in connect-src. Then reload.
The iframe shows a not found page
Possible cause: The Chat bubble is disabled.
Solution: Turn on Chat bubble availability in Bot > Channels, then reload the page.
Center stage shows a floating bubble instead
Possible cause: The page uses the Chat bubble install code, which has no layout option.
Solution: Copy the install code from Center stage > Add to website > Website widget. It includes layout: "center-stage".